
How to sell your leads in bulk
Selling in bulk lets you upload a whole spreadsheet of leads at once, have Referr match them to buyers who are actively looking for that kind of work, and put them all up for sale in one go. This guide walks through the process end to end, with a screenshot of every screen.
The whole thing takes about five minutes once your file is ready. Most of the problems sellers run into happen in the file itself, before they even reach Referr — so the section on preparing your CSV is worth reading properly.
Before you start
Two things need to be true, or the upload will stop partway through:
- Your payouts must be set up. Referr blocks bulk uploads until you have completed Stripe payouts setup, because buyers can't pay for leads from a seller who can't receive money. It's a one-time process that takes about two minutes — go to Settings → Billing and connect your bank account.
- Your file must be a .CSV. Not .xlsx, not .numbers, not a Google Sheet link. In Excel or Google Sheets, use File → Save as (or Download) and choose CSV.
The limits for a single upload are 5,000 leads and 5MB. If your file is bigger, split it and upload it in batches.
Step 1 — Open Sell Leads in Bulk
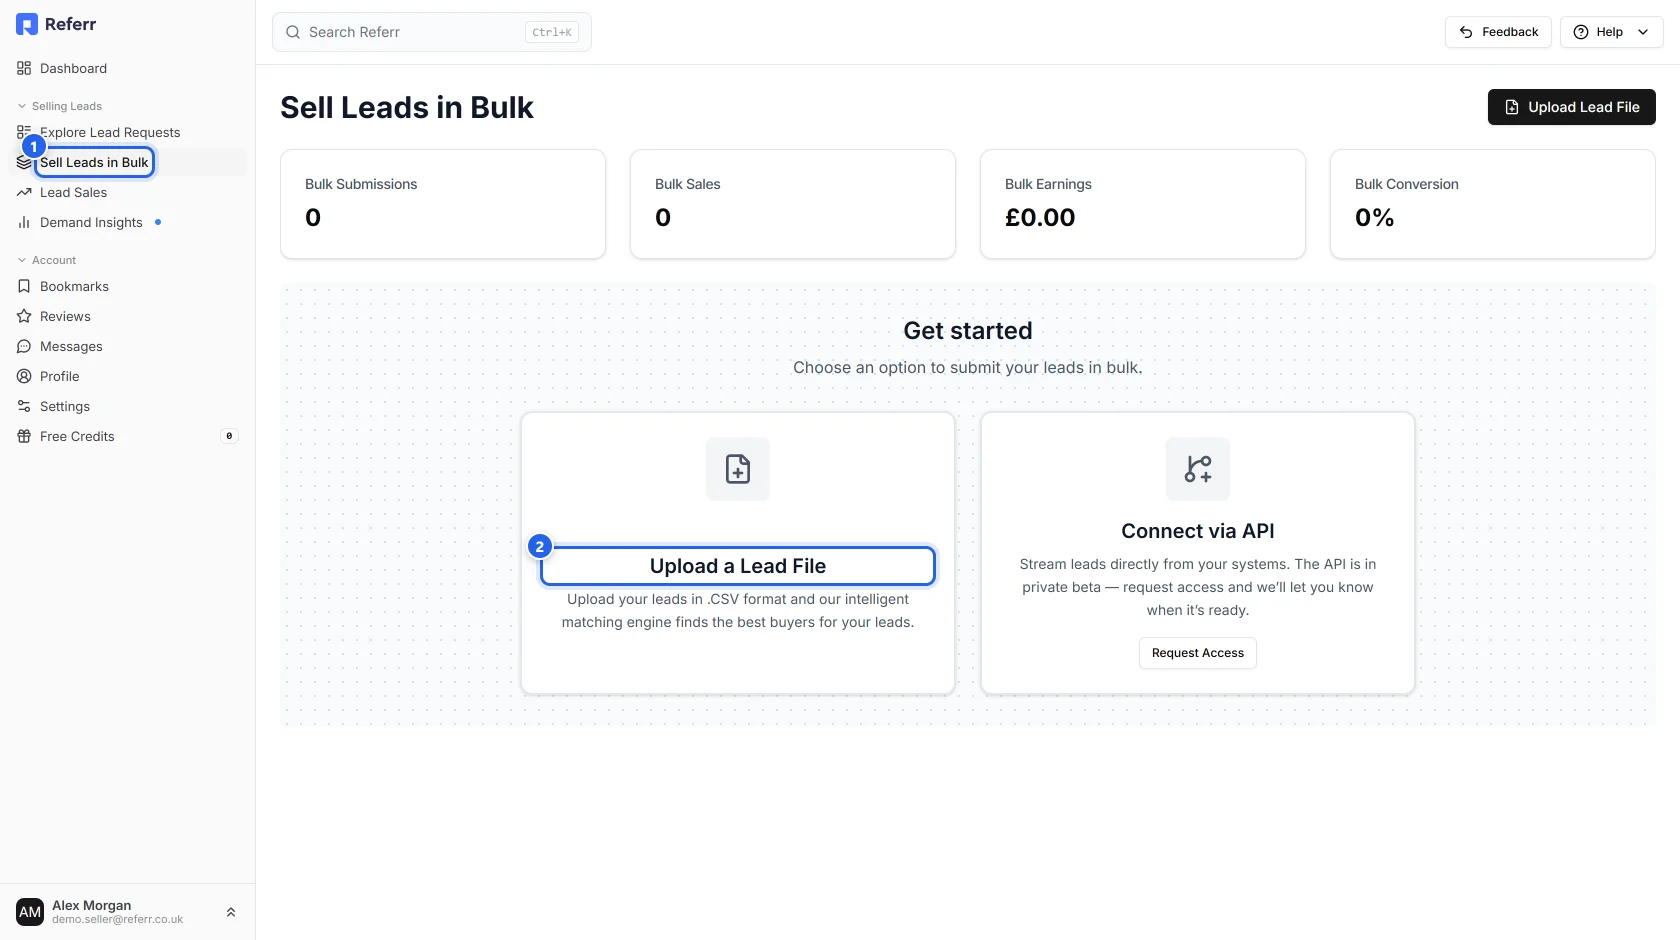
In the left-hand menu, under Selling Leads, click Sell Leads in Bulk (1). Then choose Upload a Lead File (2).
Step 2 — Download the template and the category reference
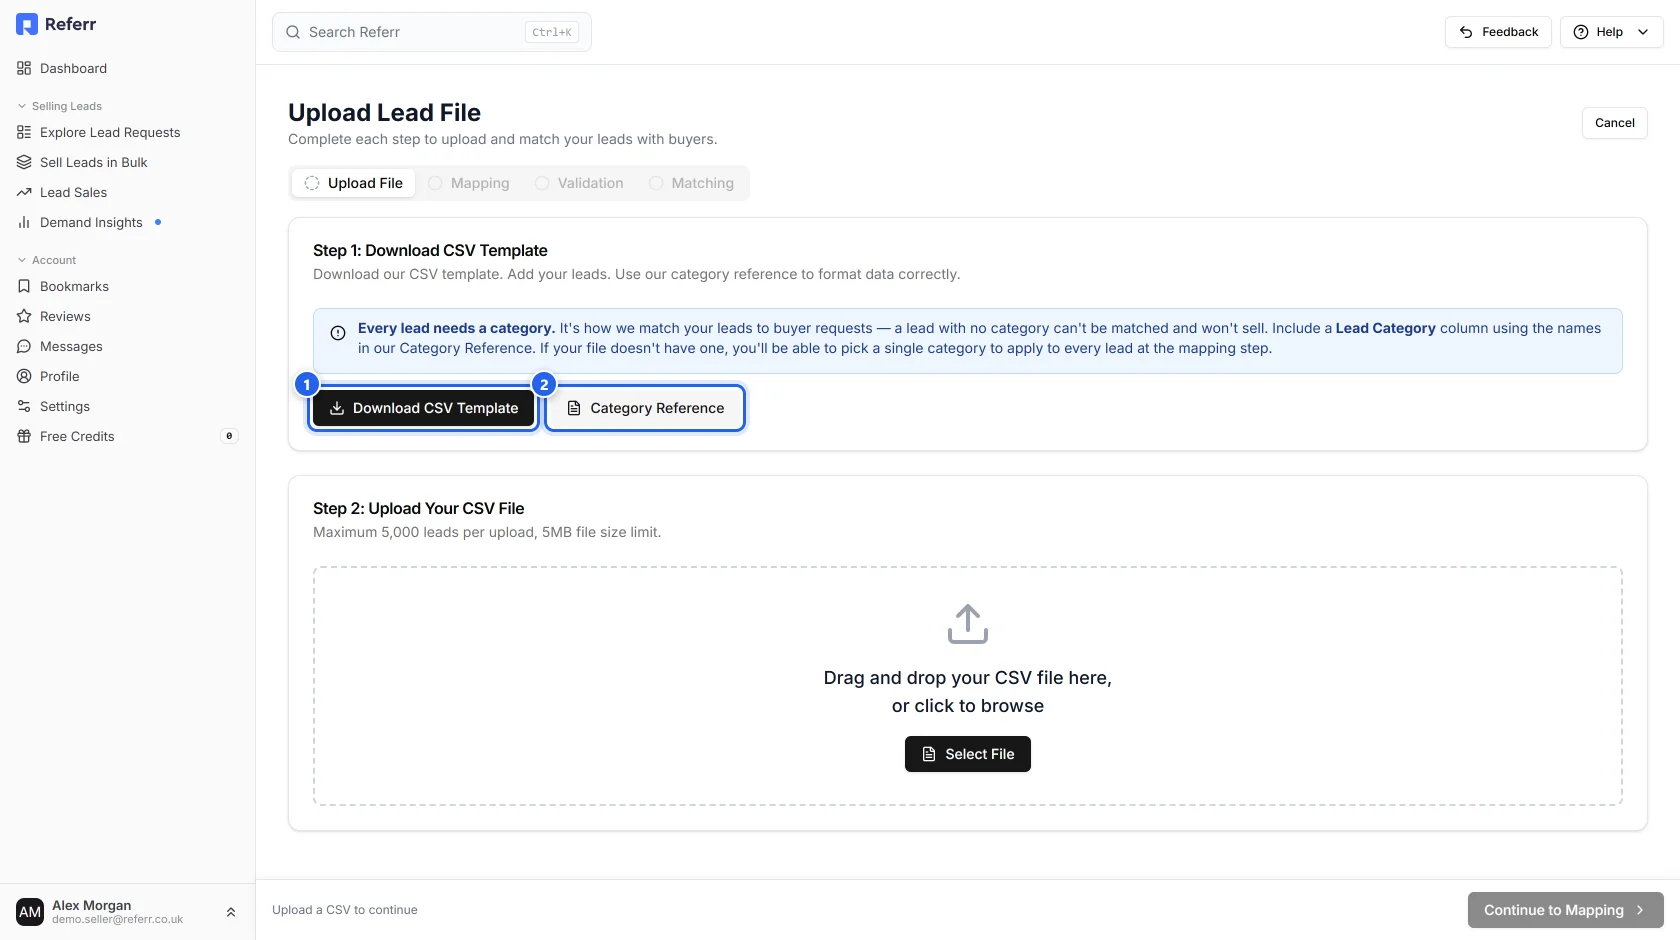
Don't build your file from scratch. Download the two files at the top of the page:
- Download CSV Template (1) — a blank file with the exact column headings Referr expects, plus two example rows.
- Category Reference (2) — the full list of categories you're allowed to use, with the typical price range for each.
Step 3 — Fill in your file
Open the template and paste your leads in, one per row. Here's what each column needs:
| Column | Required? | What to put in it |
|---|---|---|
| First Name | Required | The lead's first name. |
| Last Name | Required | The lead's surname. |
| Required | A real, working email address. Temporary or disposable addresses are rejected. | |
| Phone Number | Required | A real phone number, ideally in full international format (+447911123456). Leave the cell blank rather than writing "n/a" or "not provided". |
| Company | Optional | The lead's business name, if they have one. |
| City | Required | The town or city the lead is in. Buyers filter on this. |
| Country | Required | e.g. United Kingdom. This is also used to check the phone number. |
| Lead Category | Required | The service the lead wants — copied exactly from the Category Reference. This is the single most important column. |
| Minimum Sale Price | Optional | The least you'd accept for the lead, in pounds (e.g. 85). |
| Message to Buyer | Optional | One line of useful context — what the lead wants and how soon. Good notes sell better. |
The category column is what makes a lead sellable
Category is how Referr matches your lead to a buyer. A lead with no category, or with a category we don't recognise, cannot be matched to any buyer and will never sell. It's the number one reason a bulk upload underperforms.
So: copy the category names exactly from the Category Reference file. Electrical Installation works. Electrician, Sparky, Electrics and Landscape Gardening (if it isn't on the list) do not.
If all your leads are the same type of work, you can leave the category column out entirely and pick one category to apply to the whole file at the mapping step instead — see Step 5.
If it helps to see a finished file, download this filled-in example. It's the file used for the screenshots in this guide — the last four rows are deliberately broken, to show what a rejected lead looks like.
Four things that will get rows rejected
- Broken email addresses — typos like
name@@domain, or missing the domain entirely. - Text in the phone column — "not provided", "ask me", "n/a". If you don't have a number, the row can't be sold; a lead needs a working way to contact it.
- The same person twice — duplicate rows inside one file are automatically rejected. The first one is kept.
- Categories that aren't on our list — see above.
Step 4 — Upload the file
Drag your CSV onto the upload box, or click Select File. Referr reads it straight away and shows you the first five rows so you can check the columns landed where you expect.
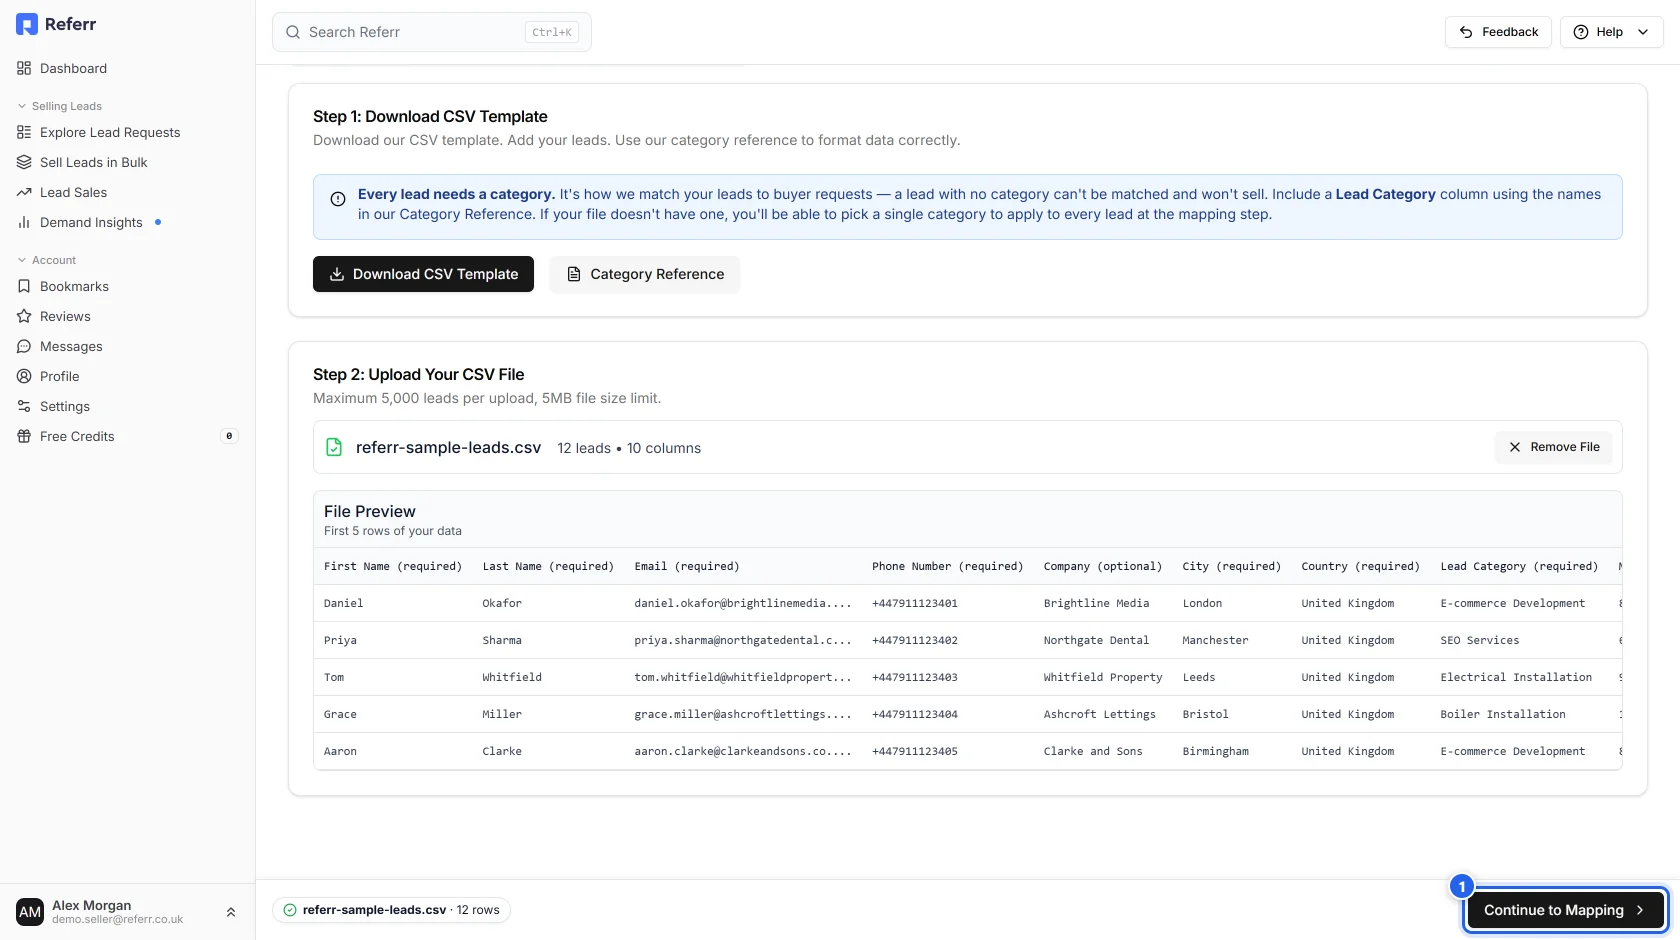
Check the lead count in the header ("12 leads • 10 columns") matches what you expected. If it's short, your file probably has blank rows or an unusual delimiter — semicolons instead of commas is the usual culprit for files exported from a non-UK version of Excel.
Then click Continue to Mapping (1) at the bottom right.
Step 5 — Check the column mapping
Referr tries to match your column headings to its own fields automatically, and tells you so at the top of the screen. Review it anyway. If you used the template, everything will already line up.
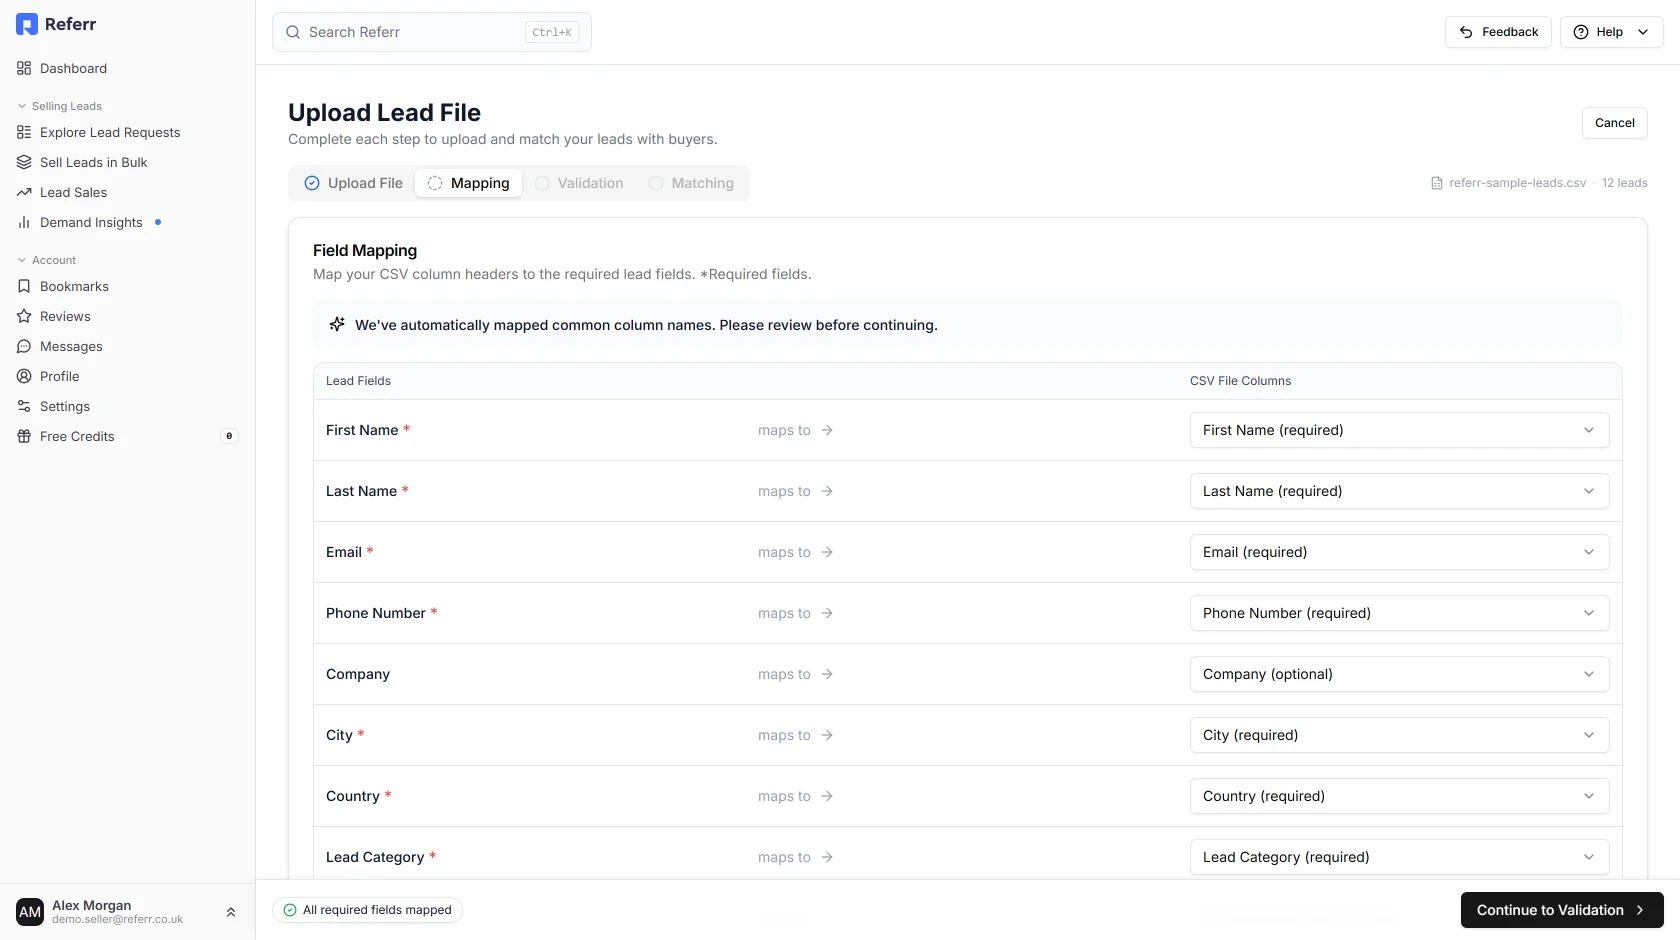
Fields marked with a red asterisk are required. If one says No mapping, click the dropdown next to it and pick the right column from your file. You can't continue until every required field is mapped, and no two fields can point at the same column.
Below the mapping table is the Lead Category panel:
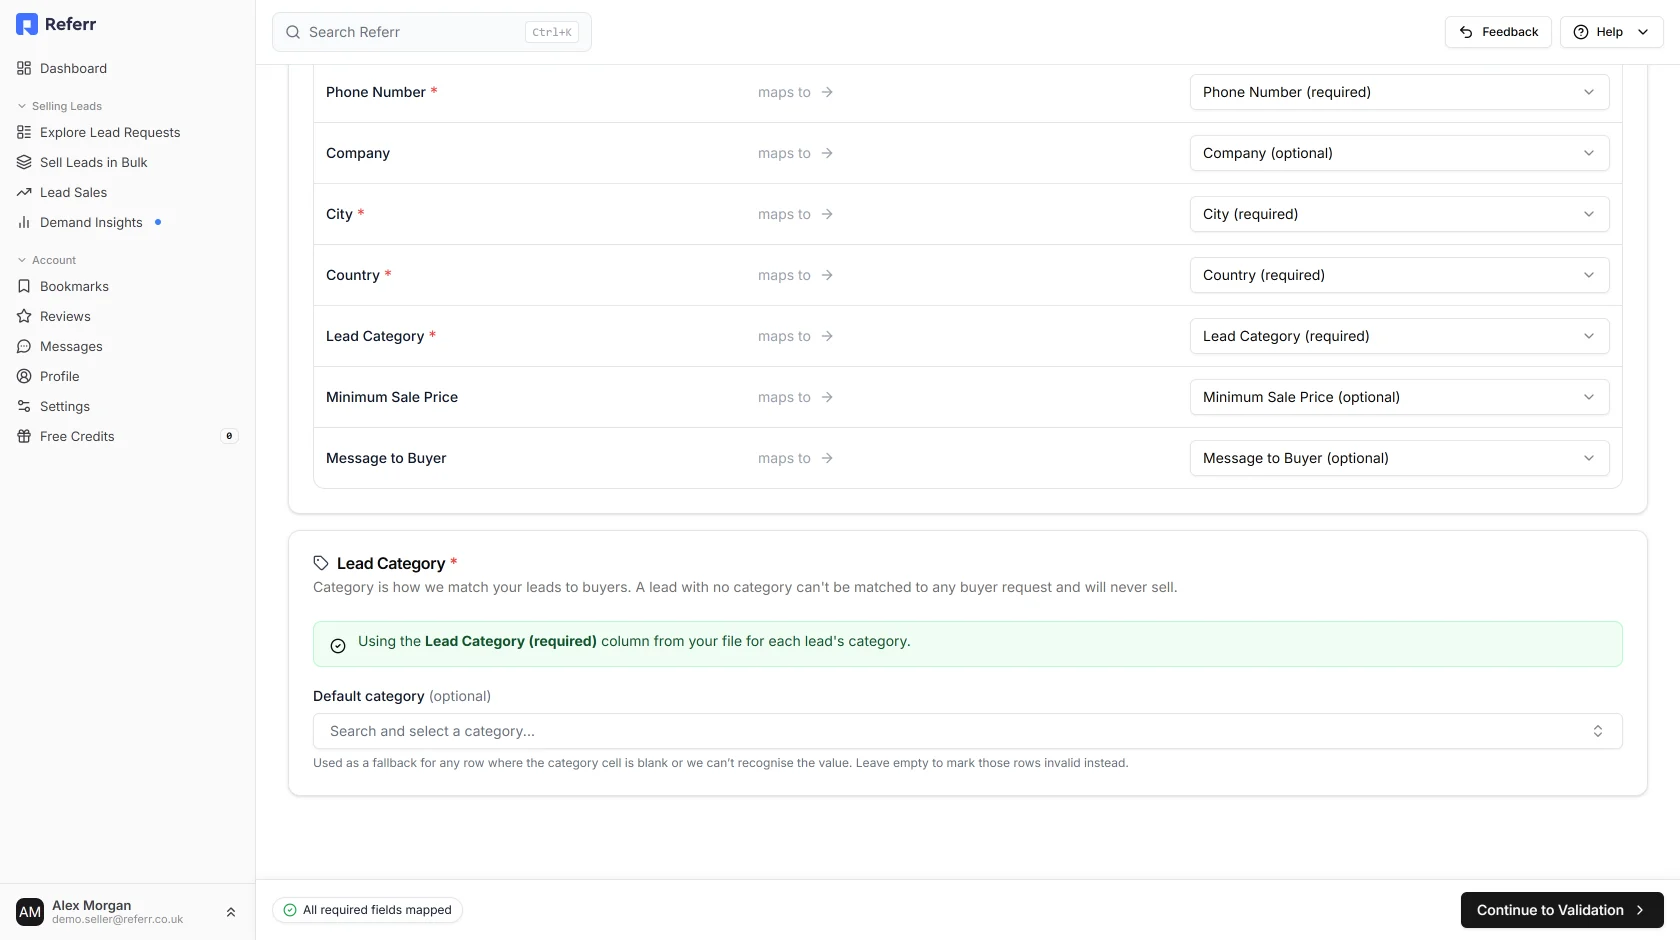
- If you mapped a category column, you'll see a green confirmation. You can still pick a default category as a safety net — it's used for any row where the category cell is blank or we don't recognise what's in it. Leave it empty if you'd rather those rows be flagged as invalid so you can correct them.
- If you have no category column, the panel turns amber and you must choose a default category here. It will be applied to every lead in the file.
Click Continue to Validation.
Step 6 — Read the validation results
Referr now checks every row: name, email, phone, location, category, and whether the same lead appears twice. This takes a few seconds for a small file and a couple of minutes for a large one. Don't close the tab or hit back while it runs.
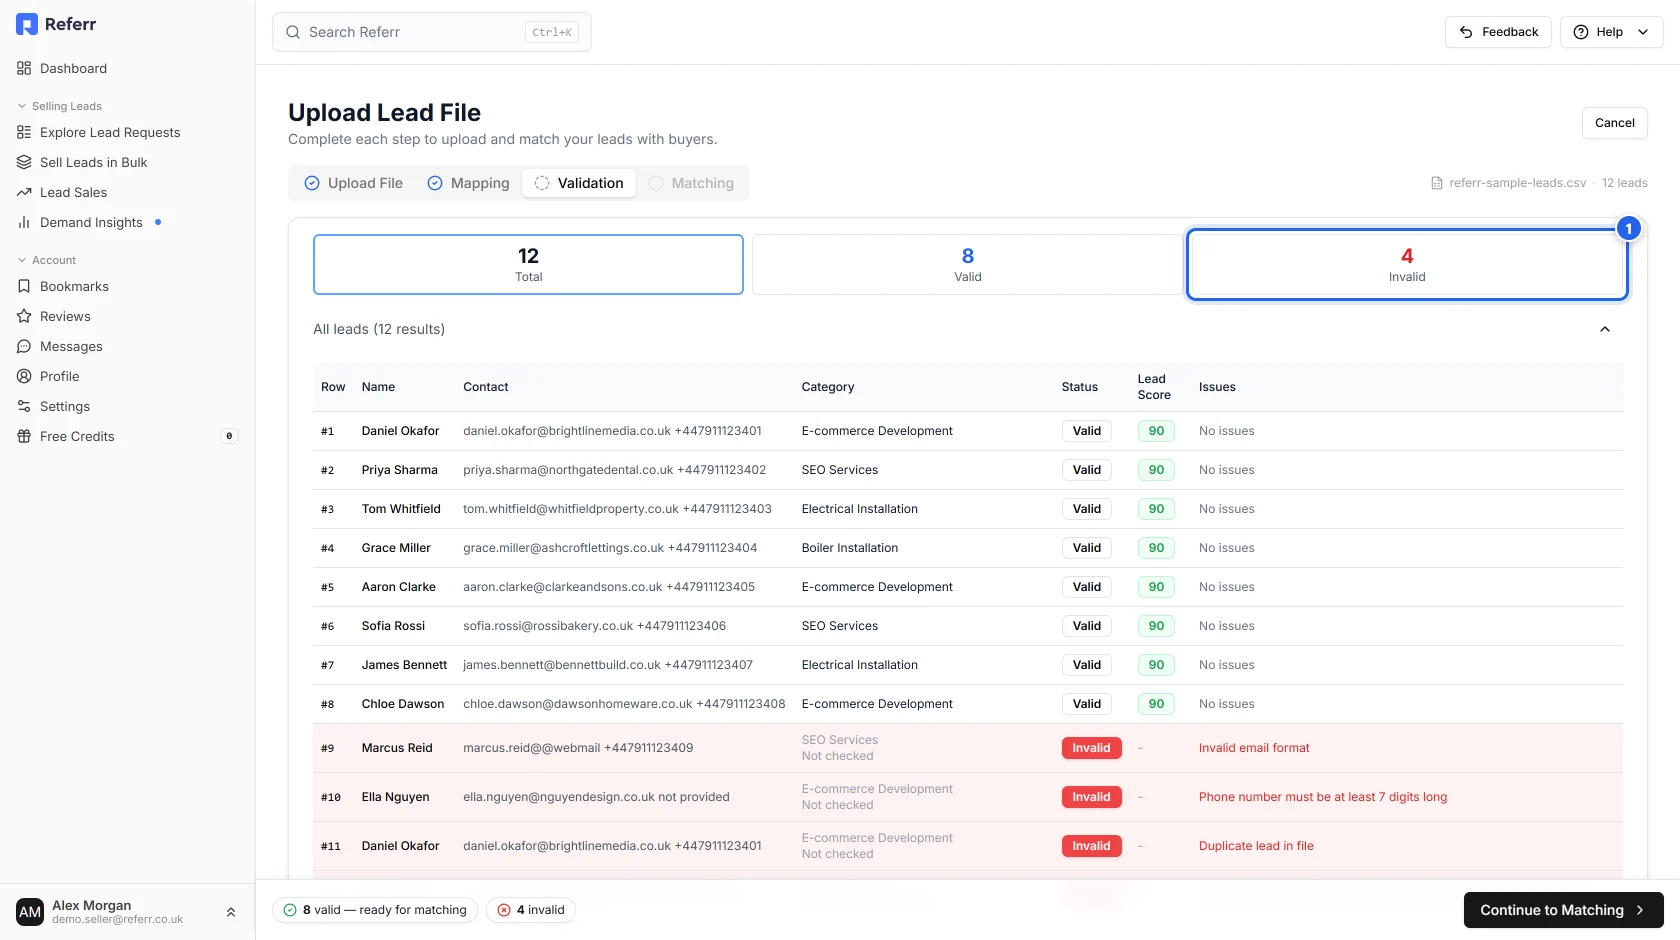
You get three counters: Total, Valid and Invalid. Click any of them to filter the table below. Each row shows a lead score and, where relevant, exactly what's wrong with it.
Step 7 — Check what failed, and why
Click the red Invalid counter (1) to see only the rows that were rejected and the reason for each.
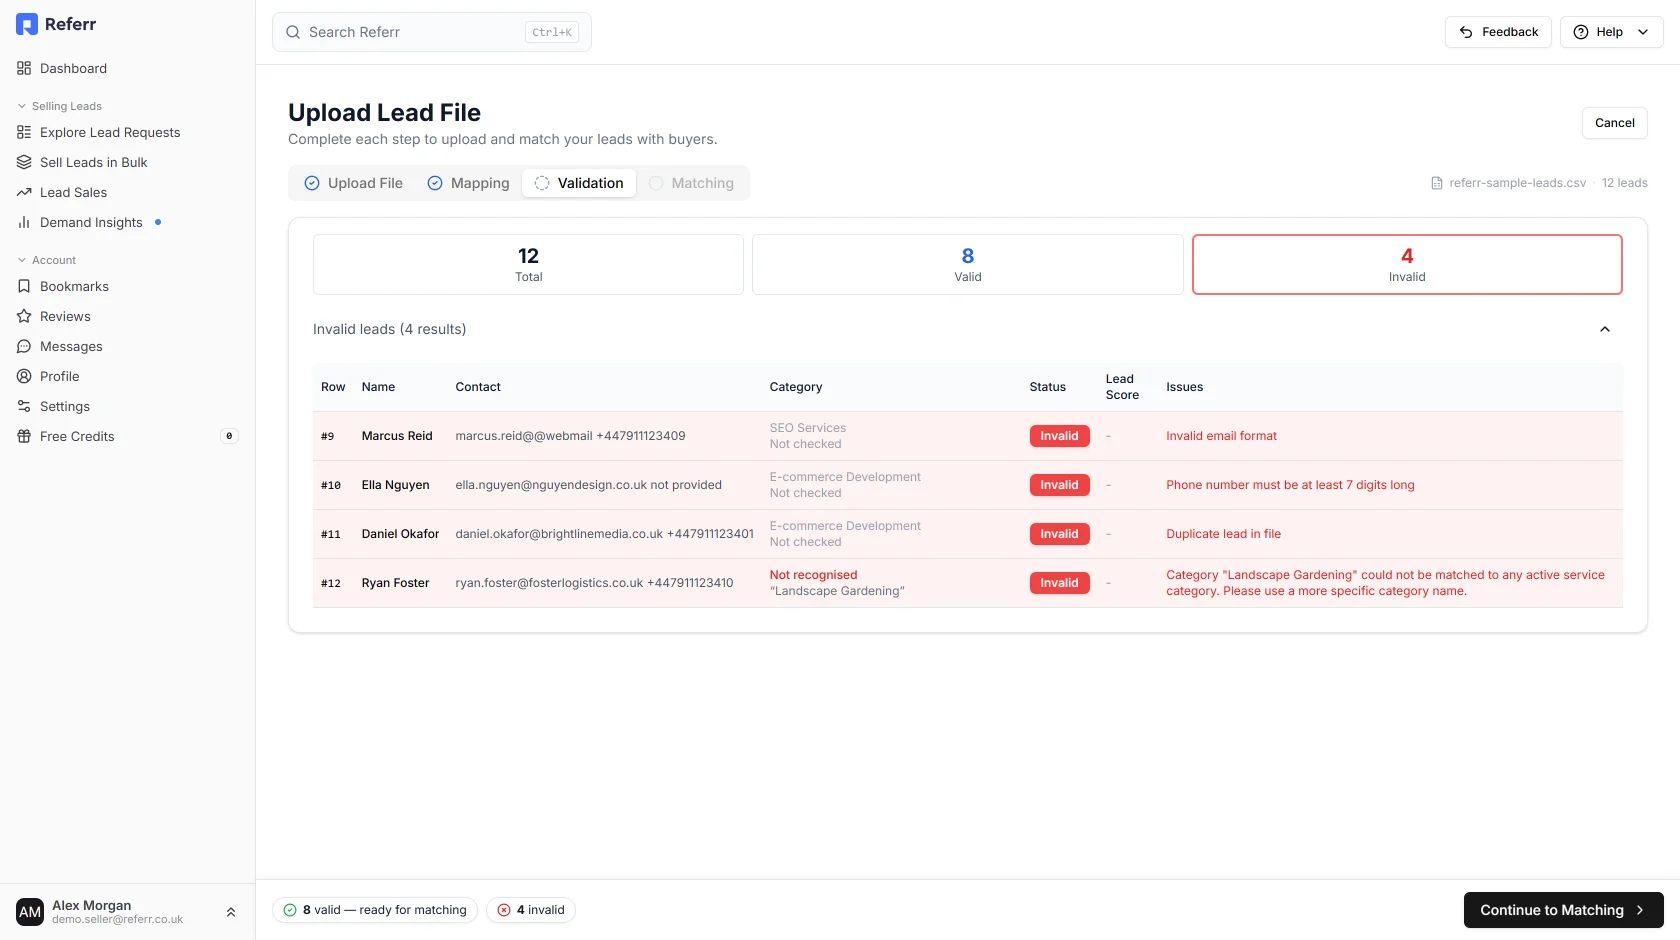
The common messages and what to do about them:
| Message | What it means | Fix |
|---|---|---|
| Invalid email format | The address isn't a valid email. | Correct it in your spreadsheet — watch for double @ signs and missing domains. |
| Invalid phone number format / must be at least 7 digits | The cell isn't a usable phone number. | Use the full number including country code. Delete placeholder text like "not provided". |
| Duplicate lead in file | The same person appears earlier in the same file. | Nothing to fix — the first copy was kept and is being sold. |
| Category "X" could not be matched to any active service category | The category name isn't one of ours. | Replace it with the closest name from the Category Reference, or set a default category at the mapping step. |
| Please use a permanent business email address | The address is on a temporary/disposable mail domain. | Use the lead's real address. Leads from throwaway addresses don't convert and buyers dispute them. |
Invalid rows aren't lost and they don't cost you anything — they're simply not sold. You have two choices: carry on with the valid ones now, or cancel, fix the file in your spreadsheet, and upload it again. Most sellers carry on and re-upload the corrected rows as a second batch.
When you're ready, click Continue to Matching.
Step 8 — See who wants your leads
Referr now searches every active buyer request for each valid lead, comparing category, location, price and buyer history.
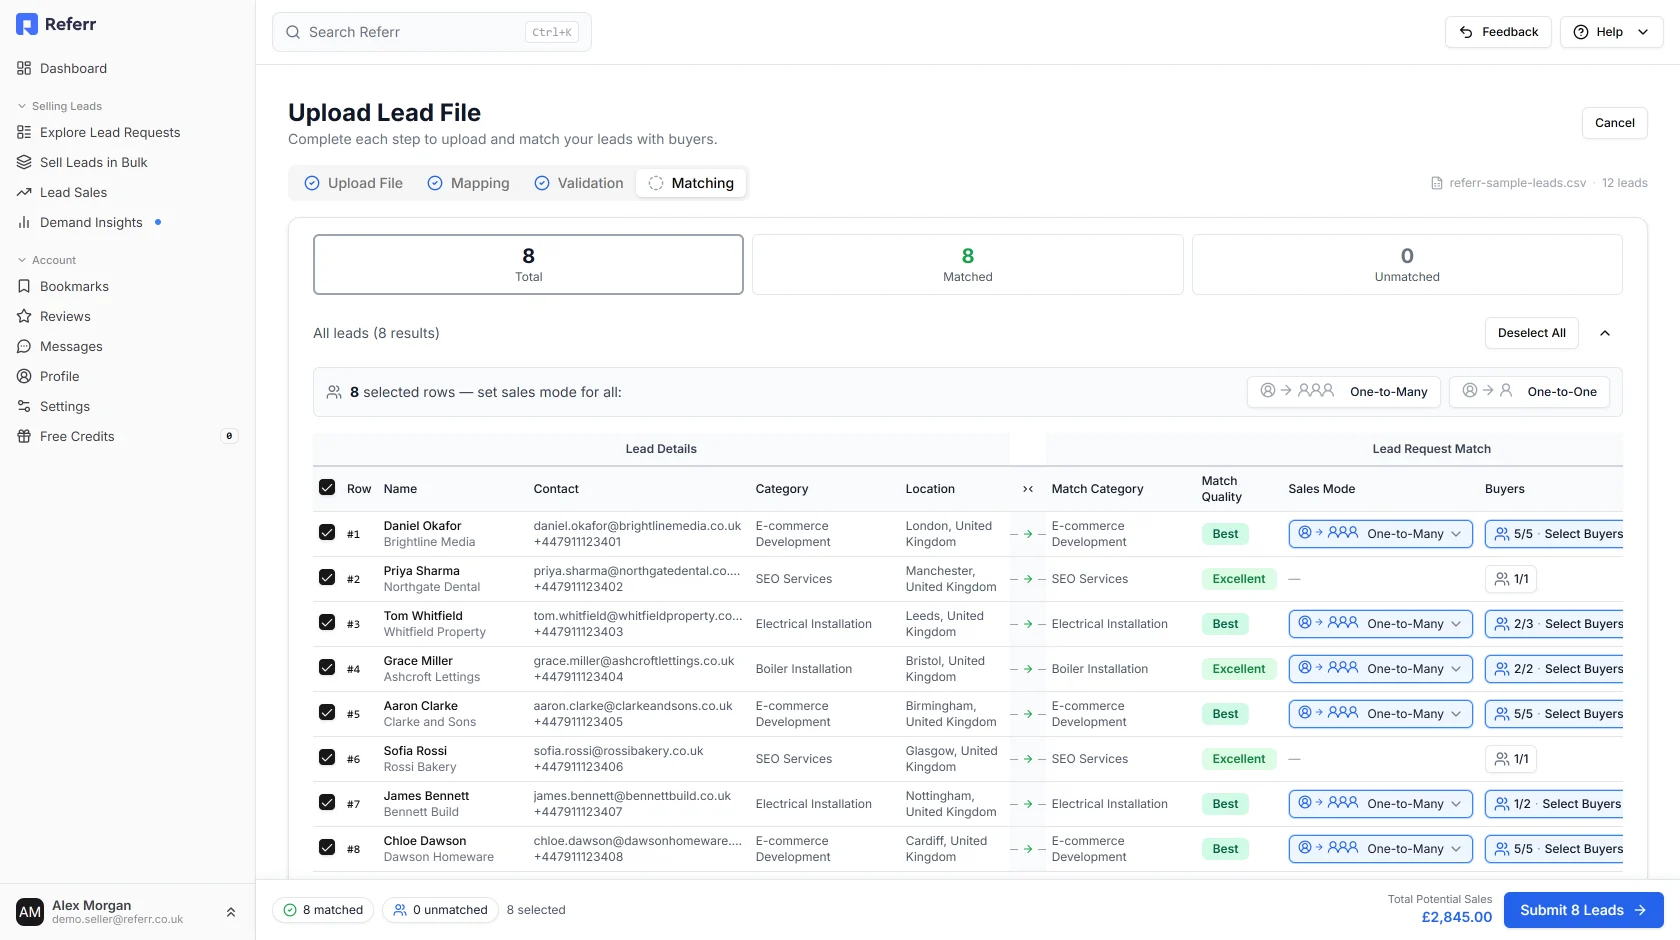
You get three counters again — Total, Matched and Unmatched — and a table showing, for each lead, which buyer request it matched and how good the match is (Best, Excellent, Good).
Unmatched leads simply mean nobody is currently buying that combination of category and location. They aren't submitted and you aren't charged. If a lot of your file comes back unmatched, check Demand Insights in the sidebar to see which categories have live buyers before your next upload.
Step 9 — Choose your buyers and how the lead is sold
Every matched row is ticked by default, and every row is set to sell to the buyers Referr picked for it. You can change both.
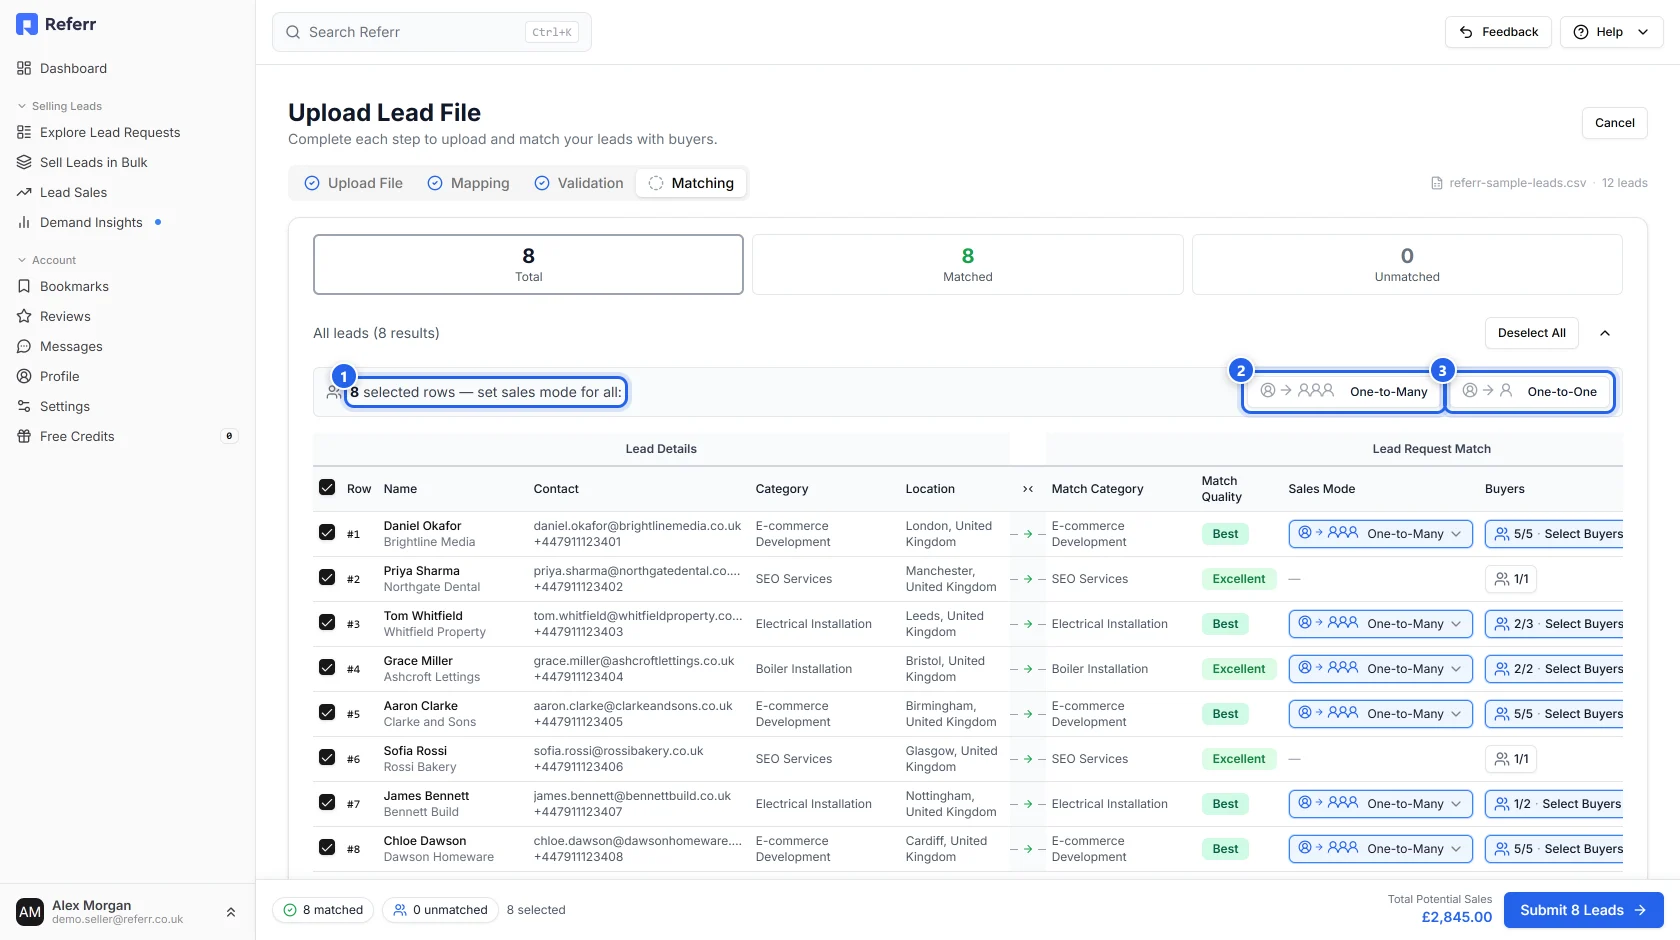
The bar above the table (1) applies a sales mode to every ticked row at once:
- One-to-Many (2) — non-exclusive. Every buyer you've selected can purchase the lead, so the same lead can earn multiple times. This is the default.
- One-to-One (3) — exclusive. The lead sells once, to whichever selected buyer purchases first.
Scroll the table sideways to see the rest of the columns: the per-row Sales Mode, the Buyers button, and Potential Sales — the most that row could earn.
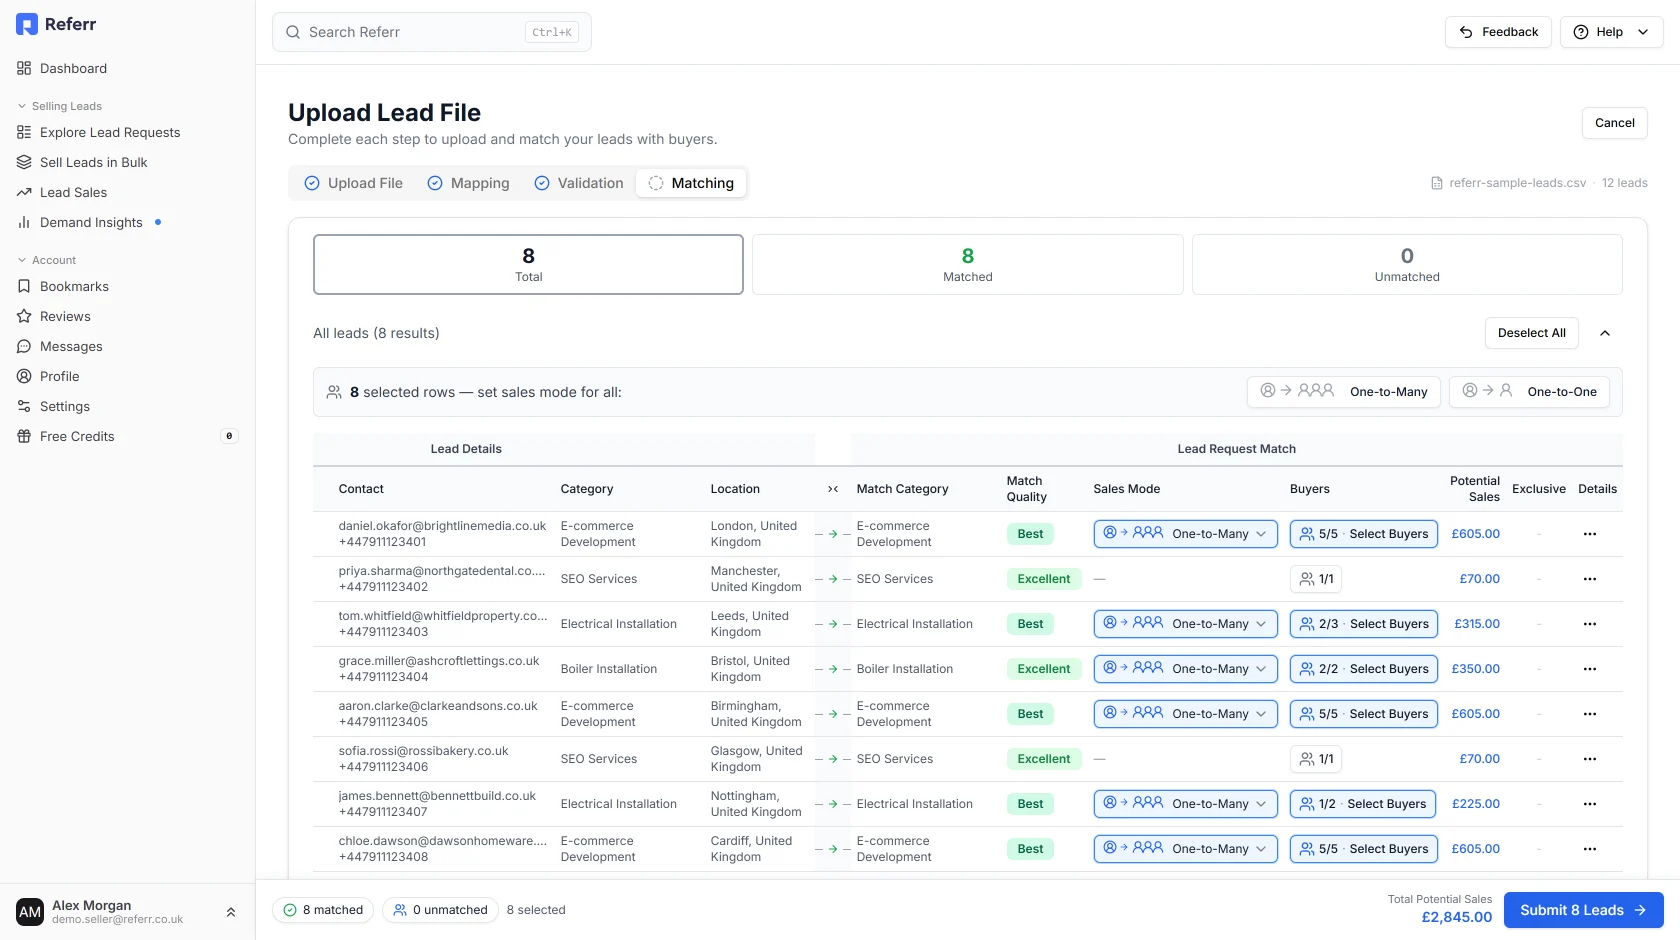
The Buyers button shows how many buyers that lead will go to out of how many are available — "5/5", "2/3", and so on. Click it to change the selection for that one lead.
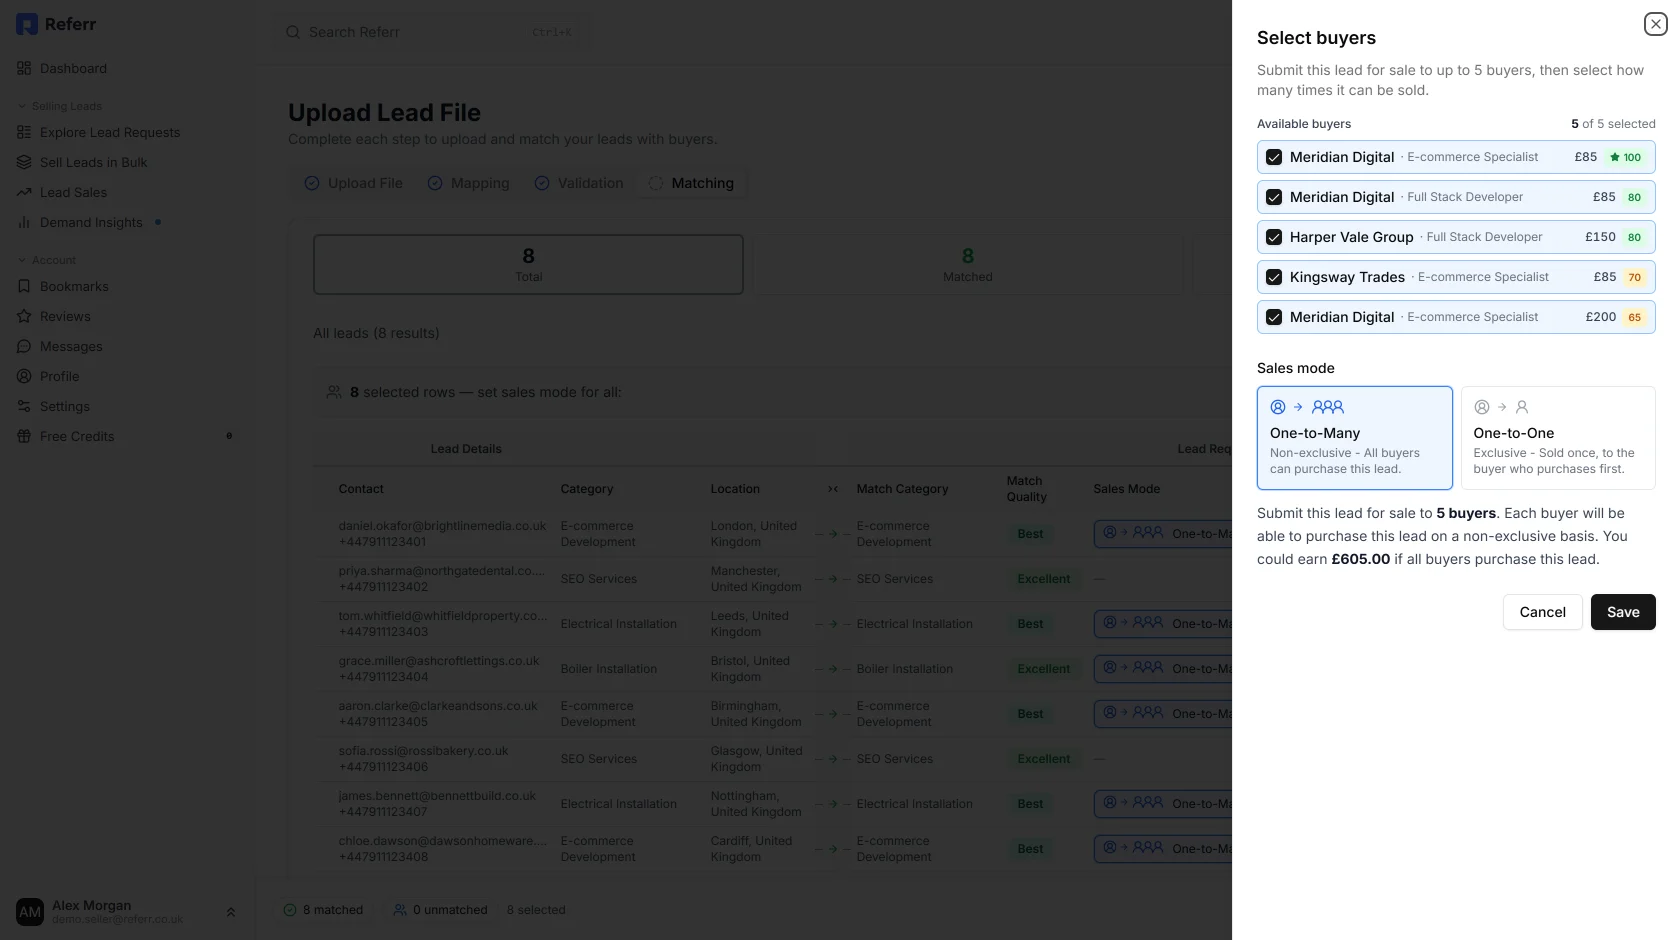
Each buyer shows the price they're paying and a match score. Untick any you don't want, choose the sales mode for this particular lead, and click Save. A lead can go to a maximum of 5 buyers. Buyers greyed out as Already submitted have had this lead from you before and can't receive it twice.
Step 10 — Submit
The bar at the bottom of the screen keeps a running total: how many leads matched, how many are ticked, and your Total Potential Sales (1) — the most you could earn if every selected buyer bought every selected lead.
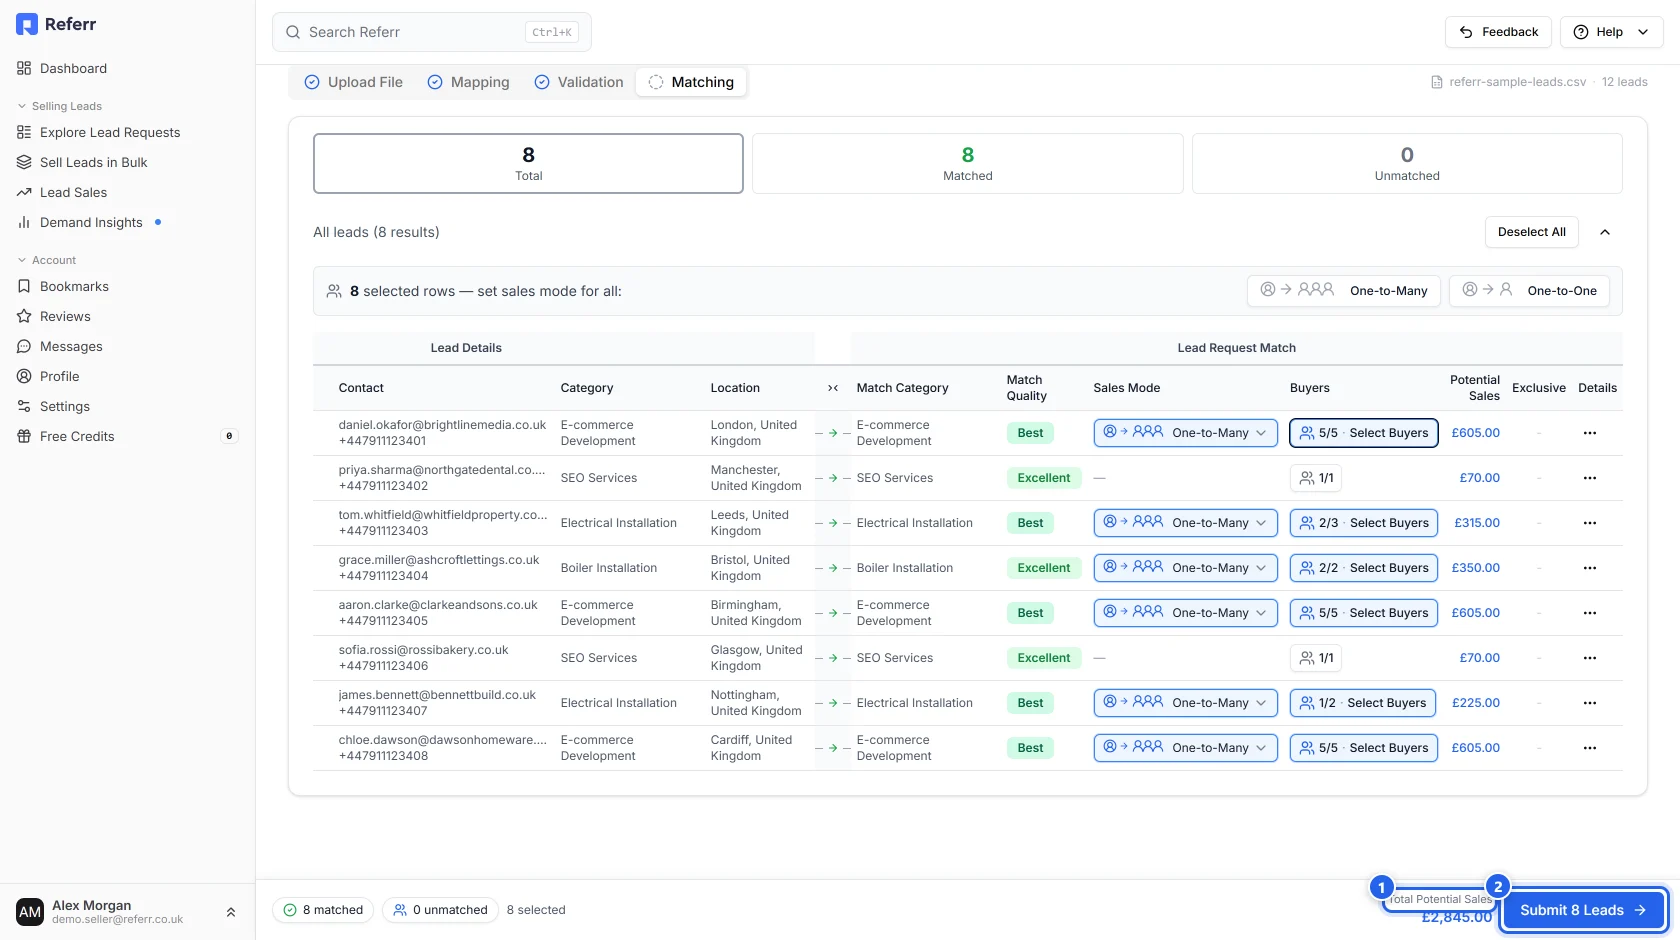
When you're happy, click Submit (2). This is the step people miss — leads are not on sale until you click this. Reaching the matching screen and closing the tab means nothing was ever offered to a buyer.
Submission takes a few seconds. Don't navigate away while it's running.
Step 11 — What happens next
You'll land back on the Sell Leads in Bulk page, where every upload you've made is listed with how many leads it contained, how many were invalid, how many matched, and how much they've earned.
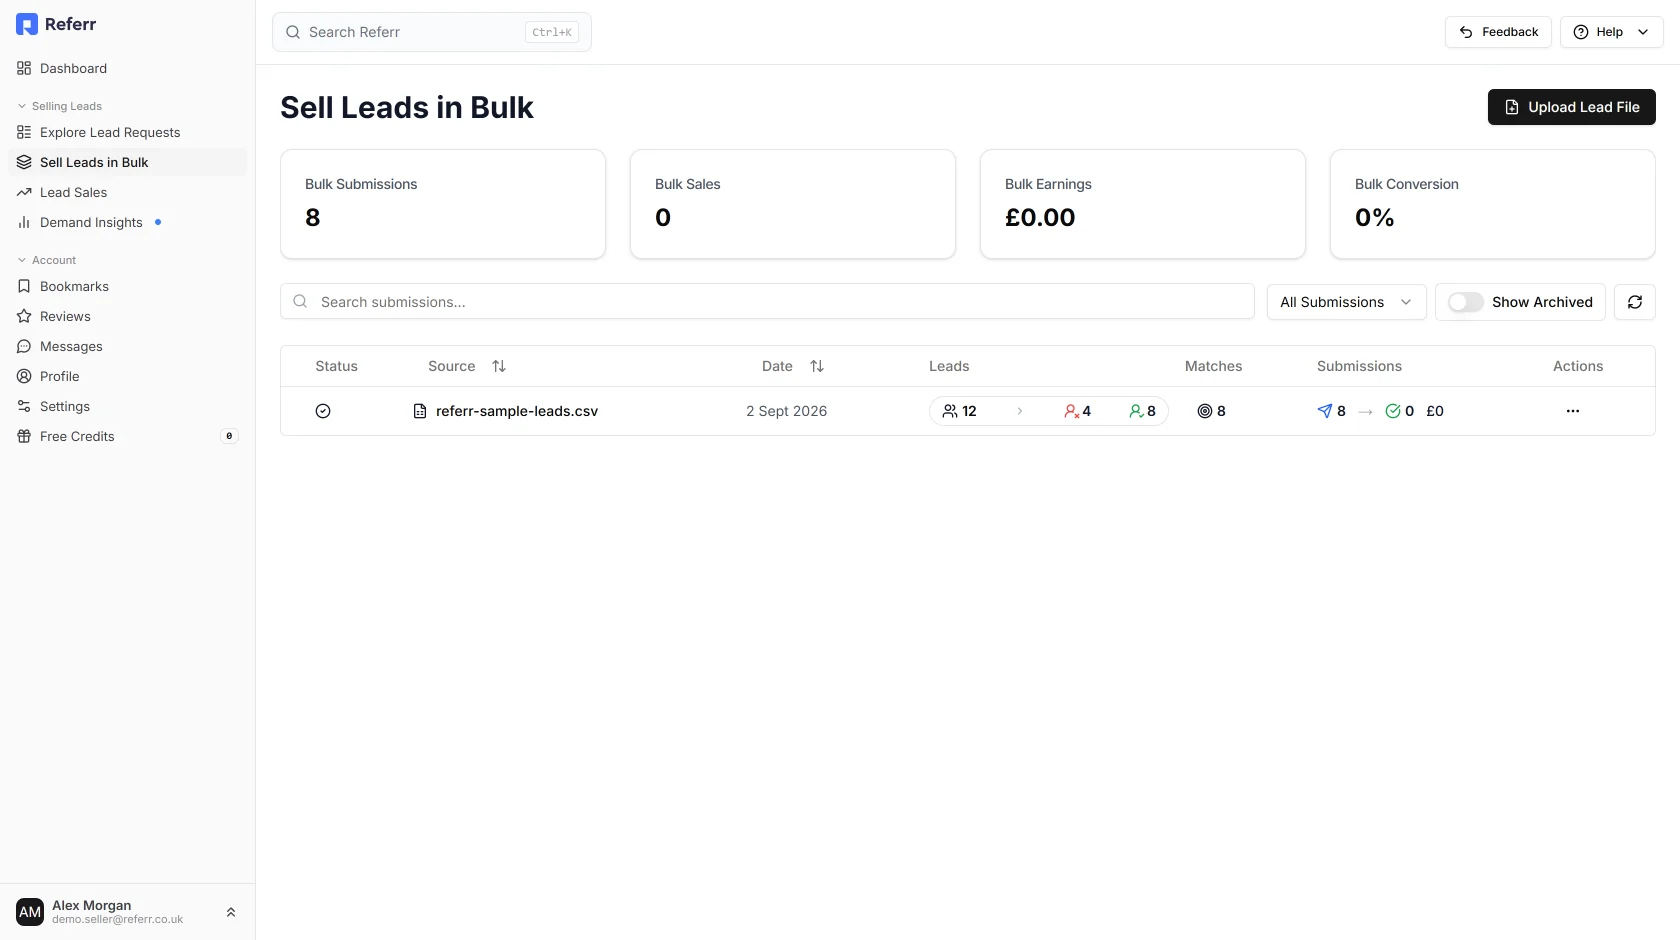
Click a row to open the upload and see every lead in it with its current status, or use Export Results to download the lot as a spreadsheet.
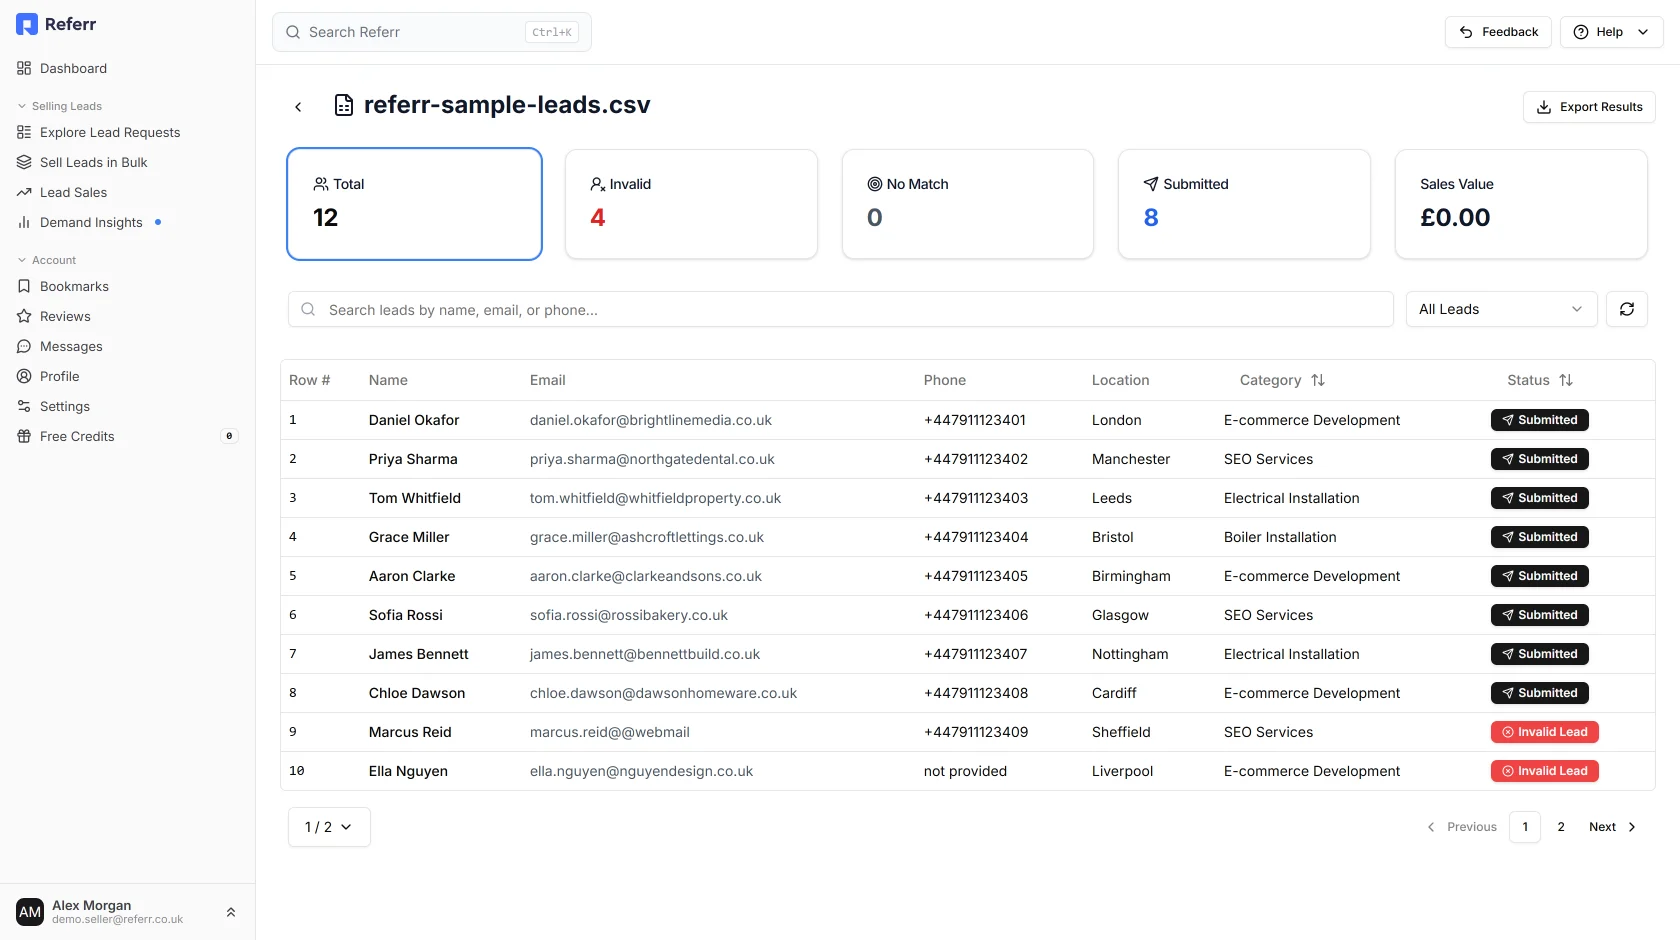
We'll email you one summary of what went live — one per upload, not one per lead. After that it works exactly like any other lead you sell on Referr: buyers see your leads in their inbound feed, and you're notified and paid when one is purchased. Earnings appear in your pending balance and clear after 7 days.
Quick troubleshooting
"Please complete your Stripe payouts setup before uploading leads"
Your bank details aren't connected yet. Go to Settings → Billing and finish the payouts setup, then start the upload again.
The wizard sent me back to the start
The upload is abandoned if you use the browser's back button, or leave it idle for 30 minutes, before validation finishes. Start again from Step 1 — nothing was saved, and nothing was submitted.
Every row came back invalid
Almost always one wrong column mapping — usually the phone or email field pointing at the wrong column. Go back to the mapping step and check each field against the preview of your file.
All my leads matched, but nothing has sold
Check the upload's detail page. If the leads show as Submitted, they are live and waiting for buyers to purchase; matching means a buyer is looking for that kind of lead, not that they've committed to buy. Leads with a lower asking price and a useful Message to Buyer sell fastest.
Nothing matched
Either the category is wrong, or nobody is currently buying that category in those locations. Open the invalid/unmatched view to see which, and check Demand Insights before your next upload.
My file won't upload at all
Check it's a genuine .CSV (not a renamed .xlsx), under 5MB, under 5,000 rows, and has a header row plus at least one row of data.
 Ask Claude
 Ask Perplexity